Word Processing Features
|
|
Word processing features are essentially
the same from program to program. So, if one learns the basic features and
how to use them, it is easy to transfer that knowledge to another program.
For example, all word processing involves the following basic features: 1.
Type size, type
font, type style, type justification 2.
Document
format, size, orientation 3.
Tabs, indents,
and blocks of type 4.
Inserted
graphics, charts, or tables 5.
Editing and
co-editing features 6.
Headers,
footers, footnotes, and endnotes 7.
Output options
such as printing, “save as,” pdf conversion, etc. If one understands the essentials of these
features in one program, one can easily adapt and learn another word
processing program. |
||||||||||||||||||||||||||||||||||||||||||||||||||||||||||||||||||||||||||||||||||||||||||||
|
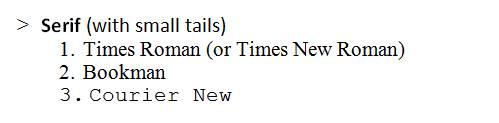
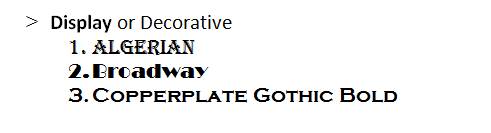
Fonts and font treatment The term “font” refers to the style of the type. There are several basic
categories of fonts:
Treatment of fonts o
Most fonts can be treated in several ways: >
Bold: This is bold. >
Italics: This is italics. >
Bold italics: This
is bold and italics. >
Underline: This
is underlined. >
Superscript: This
is superscript. o
Font size is important and is measured in “points.” The term “points” is an
older printing measurement but is still used to describe modern font size.
Type size does not display correctly on a smart phone, but you can see that
the sizes vary as the point size number increases. Academic papers should
generally be produced in 12 point Times Roman type. This is 12 point Times Roman. This is 14 point Times Roman. This
is 16 point Times Roman. This is 18 point Times Roman. This is 24 point Times Roman. Type character spacing
o
This can be important, because some spacing is easier to
read than others. For example, double spacing between lines is often helpful
when a document must be edited. This is the reason that academic papers (such
as term papers, theses, etc.) are submitted in double-spaced form. The space
between the lines allows the editor to add marks, comments or corrections
between the typed lines. Below are examples of various line spacings. >
Any paragraph can be spaced at several different spacings.
We call this the “line spacing.” The most common spacings are: single spacing and double spacing, but most
word processors allow other spacing. This paragraph is single spaced Times
Roman. > Any
paragraph can be spaced at several different spacings. We call this the “line
spacing.” The most common spacings are:
single spacing and double spacing, but most word processors allow
other spacing. This paragraph is double spaced Times Roman. > Any
paragraph can be spaced at several different spacings. We call this the “line
spacing.” The most common spacings are single spacing and double spacing, but
most word processors allow other spacing. This paragraph is Times Roman, 12
point type spaced at 1.5 spaces. Font width Different fonts have different widths. Some
have fixed widths for every
character (e.g., Courier), but most have variable
widths whereby letters like “i” or “l” are narrower than “m” or “w.” You
will notice that the two sentences below are almost identical insofar as the
text, but physically the first example is longer. The reason is simply that
the first font (Courier) is a fixed width font, while the second (Times) is a
variable width font. Here is a sentence using a
fixed font (Courier) o
Below are some other examples which indicate spacing and
style differences. Each example technically uses the same font size. Although
the font size is the same, notice the difference in length and the difference
in the type styles. Justification The term “justification” refers to the position and arrangement of lines of
text. Two basic types of justification exist:
ragged or full. The first (ragged) has three
variations: “flush left,” “flush right,”
and “centered.” Said another way, o
Text can be ragged or full justification. o
Ragged text can be “flush left,” “flush right,” or
centered Below are examples of each type of
justification.
Each form of justification serves a
different purpose and various documents generally favor different
justification. Academic papers, for example, are almost always typed as flush
left, ragged right. Published books, however, usually appear fully justified.
Adverts and invitations will often use centered texts for the sake of
appearance. Letters are generally flush left, ragged right. Tab and indent o
The “tab key”
is very useful. It jumps the text by a pre-determined amount of space. This
space can be adjusted in most word processors. Do NOT try to imitate tabs by using
the space bar. Because different fonts have different widths, the result will
look uneven and unprofessional. o
Indent is a term
which means to “push” a line or a section in from the margins. It is
customary to indent the first line of paragraphs. It is possible to indent
from the left or from the right. o
Enter (or return) – The “enter” or “return” key simply ends a line or paragraph and forces the text to the
next line. o
Shift, Caps and caps lock – Two “shift keys” are located on the left and the right of the
keyboard. There are two so that typists can capitalize letters with either
hand. >
The left shift key is used with letters on the right side;
>
The right shift key is used with letters on the left side.
>
The “caps lock” key forces every key stroke to be capital.
“Caps” is simply an abbreviation for “capital.” This key can be useful when
you need to type a long word or phrase in caps. o
Delete and backspace – Many keyboards have both a “delete” key and a “backspace” key. They function
similarly. >
The delete key deletes whatever is in front of the cursor
or whatever text is selected. >
The backspace key deletes whatever is behind the cursor or
whatever text is selected. Page formatting terms and concepts o
When typing a document, you have a wide variety of
choices. Knowing your options will help you produce nicer and more
professional looking documents. o
Page size can be varied. A4 is the most common
“page size” in Zambia and the UK.
So-called “Letter” size is commonly used in the United States. o
Margins can be varied. >
If a document is going to be stapled, it is best to have
equal “margins” on the left and
right. A one inch margin is typical for many documents. >
However, when you intend to staple a document into a booklet,
it is best to have a wider margin on the left (perhaps 1-1/2”) and a smaller
margin on the right (perhaps 1”). o
Page numbers are especially helpful if your
document is more than 2 or 3 pages long. “Page numbers” can be at the top or bottom, and can be centered,
flush left, or flush right. o
Headers and footers – Most word processors have a
feature which will add a “header”
at the top or a “footer” at the
bottom of the document. This can be helpful to indicate what the document is
about, especially in a multi-section document. It also allows the addition of
other helpful information such as file name or date. o
Paragraph spacing >
It is often helpful to have a little extra space between
paragraphs to make reading easier. We refer to this as “paragraph spacing.” Some word processors can be set to
automatically insert space after every paragraph. o
Headings and Subheadings >
Often, you will want to use “headings” to indicate the beginning of an important section. You
can center the heading and use bold type or underlined type to highlight the
beginning of the section. >
“Subheadings”
can be created by using bold (upper-lower) flush left. This distinguishes it
from the main heading. >
“Sub-subheadings”
might use light face italics. Below is an illustration: This is a Heading Using Bold Face and
Underlined This is a
Subheading This is a
Sub-subheading Shortcut Keys Shortcut keys are available in
almost every software program. Your work will go much faster if you take the
time to learn the shortcut keys.
Editing and co-editing your work. o
Good writing and production of written materials requires
careful “editing.” You should work
hard to be sure that your work has very few errors. The place to begin is to edit
your own work, both while you are typing it and after you finish. o
A second helpful thing to do is to ask someone to read
your work and provide feedback and input. It is easy to miss something, and
having a second set of eyes look over your work is very useful. o
Modern word processors also have ways to help you with
editing. They have built-in dictionaries
that know when a word is spelled wrong. They also know when your grammar is
incorrect. Here are some ways to use word processors to help proofread: >
A misspelled word will appear with a red line under it. >
Wrong grammar will appear with a green line under it. >
Use the built-in “spell
check” to search incorrectly spelled words. >
Use the built-in thesaurus
to check for other words in order to make your writing more interesting. >
Use the “word count”
feature to monitor how many words are in a particular document. Some
institutions require a minimum of words and this feature can help you know
how many words you have. Create A New Document Open your word processing program and
create a new document. o
Adjust the paper size and margins. This can be done in
Libre Writer or in Word. o
Type words from your letter (from previous lesson) into
the document. You may look at the keyboard for this assignment. o
Practice shortcuts on the words in the document: bold
(Ctrl-b), italics (Ctrl-i), underline (Ctrl-u), flush left (Ctrl-l), flush
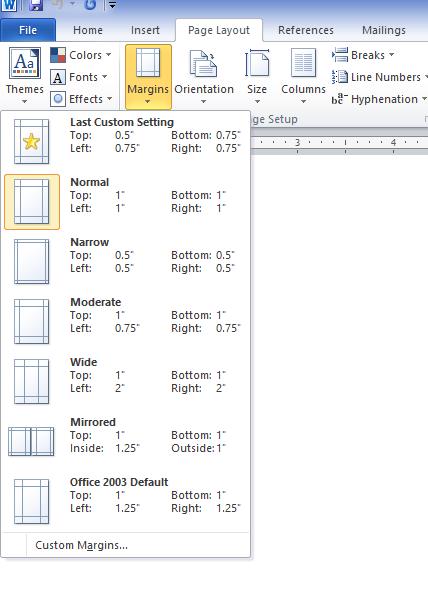
right (Ctrl-r), center (Ctrl-e). In Microsoft Word, left click the “Page layout” “tab,” then left click the “Margins”
feature from the menu. Continue to choose the margins you want. You will see
a “pull-down menu” under “Margins." Select a pre-set
margin or customize your own.
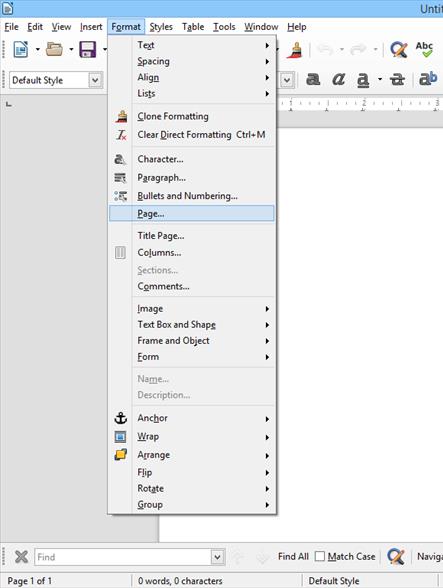
In Libre Writer, the process is similar.
The “Format” pull-down menu allows
many different changes in settings. Margins can be set by selecting “Page” from the pull-down menu.
After selecting Page, a “dialog box” will appear which gives
various page settings: paper size
(format), Margins, Layout settings, etc. It is here that you also set “Portrait” versus “Landscape” (or, vertical versus
horizontal orientations). Notice also
that the “tabs” at the top of the
dialog box: Organizer, Page, Area,
Transparency, Header, Footer, Borders, Columns, and Footnotes. Each tab will
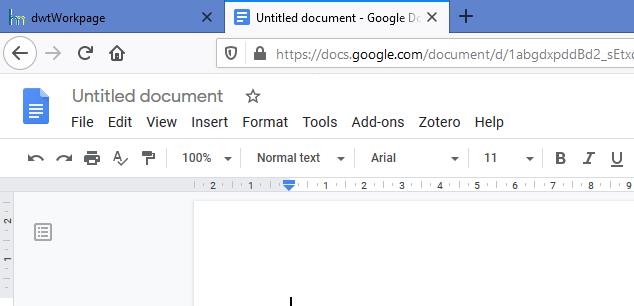
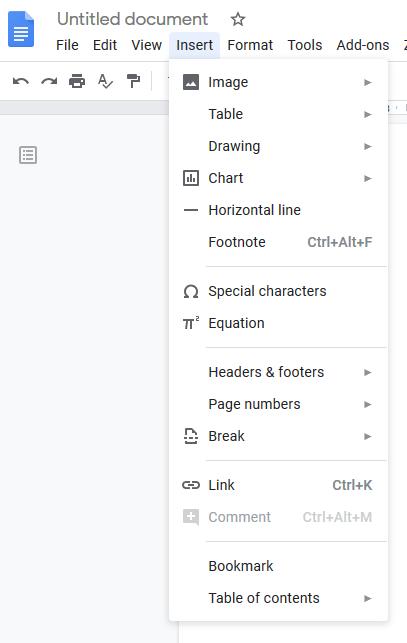
give you a variety of formatting choices. You will find the same basic features in
Google Docs. The location might be different, but the same features can be
found. So, for example, in the image below, you will see a “ribbon” just as
you do in Libre and in Word. The ribbon has various categories such as: File, Edit, View, Insert, Format, Tools,
Add-ons, etc. One would expect to find the “save” command under “File” and
the “Margins” function under “Format.” You can see from the selected ribbon
that this document is set for 11 point Arial font.
The bottom line is that one can use any of
these word processing programs and produce similar documents without much
difficulty. Save your document o
Save (Ctrl-s) to an appropriate folder on the computer. o
After having saved a document the first time, Ctrl-s will
“save over” the previous version.
But, you can use the “save as”
function to easily save your document under a new name. This is wise as a way
of “backing up” your work. Save subsequent versions using a system which
seems easy for you. For example, you might initially name the file: zacuTyping-v1. By using “save as” you can
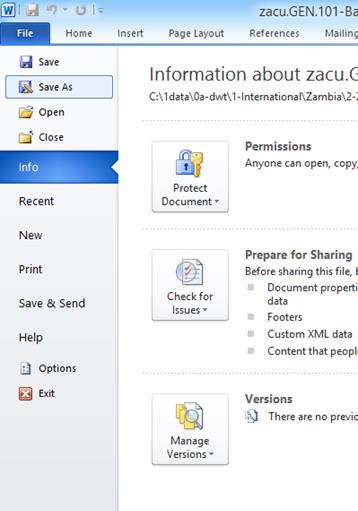
preserve the zacuTyping-v1 while save a new version named: zacuTyping-v2. In Word, you will find the “save as”
command under the File tab.
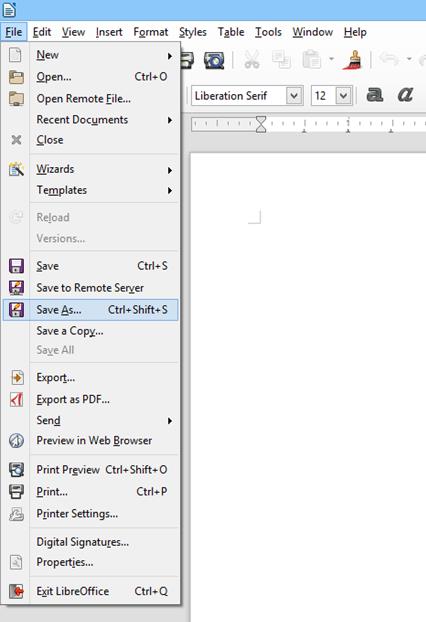
In Libre Writer, you will also find the
“save as” command under the File menu:
Notice that Libre Writer includes a
function called “Export as PDF” which allows the user to easily convert the
word processing document to PDF format, thus allowing it to be sent via email
but not allowing easy alteration of the document by the receiver. Copy (Ctrl-c) and paste (Ctrl-v) The “copy” command
(Ctrl-c) will work for words, characters, images, files and even folders. Its
companion is the “paste” command (Ctrl-v). After copying something, you
simply navigate to the location where you want to paste it, and key Ctrl-v in
order to paste the item in the new location. It will remain at the old
location as well because you “copied” it. Then, copy it (Ctrl-c), move your cursor,
and paste it at another location in the document. These commands work
identically in Libre Writer and Microsoft Word. Practice other shortcuts such as bold,
italics, underline, flush right, flush left, and center. Remember these and
other functions appear on the “function
ribbon” at the top of Libre Writer and Microsoft Word. Printing and Outputting your documents
o
To print a hard copy version of your work, select the
print function. You can do this from the File menu or with the shortcut,
Ctrl-p. After keying in Ctrl-p, a new screen or dialog box will appear which
gives you a variety of choices. o
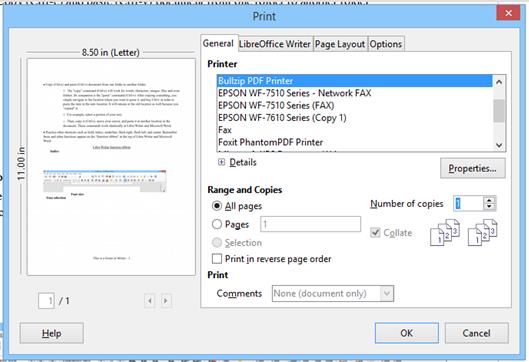
Below is the dialog box for Libre Writer. Notice that the
use can choose which printer to use, which pages to print and how many copies
to print. In this dialog box, if you choose to do more than one copy, the “Collate” feature will become bold
(meaning it is activated). This feature allows you to automatically print the
document with the pages in the correct sequence. This is especially helpful
for long documents (such as this module), where you might have 20+ pages.
Failing to use this feature would force to “hand collate” all the sets of the document. o
o
You can also output a soft copy (electronic). There are
several ways to do this. Most soft copy output is produce in so-called “pdf format.” PDF is a special file
type which cannot be edited. It is also quite easy to attach to emails and
copy to flash drives. Some software has a built-in “pdf printer,” however you also output to a “virtual printer” such as Bullzip. Look at the dialog box above
and you will notice one printer is named “Bullzip PDF Printer.” Selecting
this printer would produce an electronic version of your document which can
be saved to computer or to a flash drive. For my recent book, the editor sent
final “proofs” of the chapters in
PDF form for me to review and make corrections. o
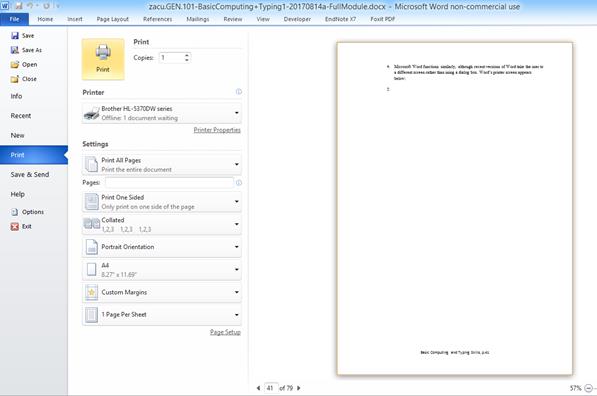
Microsoft Word functions similarly, although recent
versions of Word take the user to a different screen rather than using a
dialog box. Word’s printer screen appears below. In order to select the
printer, left click on the downward triangle to view the various printer
options. As you can see, users can print all pages, some pages, set the
number of copies, and collate,
Creating columns, changing the column
width, forcing the next column Using “columns” is a great way to
consolidate more information on one page, thus saving paper and making
information immediately seen by readers. The columns feature can be found on
the page layout menu in both Libre Writer and Microsoft Word. It can also be
found in Google Docs. The
Insert Feature o
Inserting headers or footers, adding text to them o
Inserting graphics, changing their size, cropping them >
Find a graphic on the internet. >
Right click and copy it. >
Go to your document. >
Paste it where you want it. >
Modify it as necessary (“crop” it or enlarge or reduce
it). o
Inserting a table, changing column widths, and putting
information into the table.
The text in each cell can be centered,
flush left, flush right, bold, italics, underlined, etc. The size and font
can also be changed. Google Docs has the same insert functions
as the image below shows:
|
|||||||||||||||||||||||||||||||||||||||||||||||||||||||||||||||||||||||||||||||||||||||||||||